Showing posts with label FO's. Show all posts

Sunday, January 27, 2008

Noro Kureyon Sock: yarn review (and an FO)

**Edited to add my Sock Recipe for this pair**

The Noro socks are complete.
Noro Kureyon Sock
There's just something about Noro. The intense color saturation, the transition between colors, the handspun quality. It's almost enough to negate the stiff feeling hand, bits of splinter and twig throughout, and (of course) the requisite knot, screwing up the color sequence. (On that last bit, I snipped out the knot, then wound off almost an entire color repeat to get back to where I should have been. Pain in the arse, I tell you.) It also should be noted that I probably would have been wise to knit from the outside of the ball rather than pulling from the center, as this yarn sticks to itself even as it's coming out, and tangles just for the sheer joy of it.
"Is this what you do with these cable needles?"
"I am Mommy's little shadow. She seems to be totally absorbed in these things. I think I'll take a taste"

The knitted fabric was a little thicker than the usual fingering sock weight because of the slubs throughout, and felt a bit stiff. Much of the stiffness disappeared in the first wash, and although these will never be considered "soft" or "cushy", I didn't find them scratchy on my feet (for comparison, I do find Brown Sheep Wildfoot to make me itch wildly).

"I will knit these for you"
"This is how she's doing it, right?"

On the yarn's label, it doesn't specify if the wool is superwash or not, and it does say hand wash and dry flat, but when I squished them around in my wash (not so carefully -- but not too rough), I didn't notice any felting in the least. The yarn is tightly spun and includes 30% nylon content, which, along with my tight gauge, should make this a moderately hard-wearing sock, single-ply notwithstanding. I did go down one needle size to turn the heel though, just to be safe.

"I love Noro, Mommy!"
"Perhaps I'll just take the finished one out for a little play."

Bottom line: would I knit with this yarn again? If my local yarn shop begins to carry it....and it has, say, shade 185, 188, 164 or 092 in stock...right. It'll be in my little market bag. There are other yarns out there that might be more pleasant to knit, but...well, let me ask you this -- has the troubles with Noro ever stopped the masses in the past? No. There will be some negative reactions, yes, I'm sure, but overall, there's just nothing like Noro.
Taking the sock to play
(She's actually been crawling around with one or the other sock since I completed them -- I guess it's never too early to start a Noro addiction.)

PROJECT SPECS
Yarn: Noro Kureyon Sock color #185
Needles: KnitPicks Classic Circular, size 1 (knit one at a time, cuff-down, magic-loop).
Gauge: 9 stitches per inch
Notes: These were knitted plain with a twisted 1x1 ribbed cuff. I started the second sock (color wise) right where I'd left off with the first one. Usually I am obsessively matchy-matchy, so this was pretty fun for me. I love the way they turned out.
Pattern: This is more of a recipe than anything -- get actual numbers for heel turn and such here (I did a round heel though like the one found here, not a Dutch one).
Cast on 64 stitches. Knit twisted 1x1 ribbed cuff for 1 inch (knit 1 through the back loop, purl one, repeat around). Switch to plain stockinette (knitting all stitches) for as many inches as you'd like (or, to be just like me, until it's 7 inches from cast on edge).
Begin slipped stitch heel-flap on 32 stitches and knit until it's a square (mine was 19 slipped stitches tall, or 38 rows).
Turn heel.
Pick up sts on edges of heel flap and knit in the round again until you reach base of big toe (for my US size 8-1/2 foot, I knit 7-3/4"). Begin toe decreases. Continue decreasing every other row until there are 24 stitches left. Graft closed with Kitchner stitch.


I finally discovered (a few pairs of socks ago), how to avoid a hole in the corner of the heel:
Noro Kureyon Sock: heel
When I get to the spot where the hole always presents itself, I pick up a stitch from three rows down, twisting each stitch as I ladder it up. Not sure if that makes sense. Anyway, this makes it really really nice and tight, and I don't have a hole problem anymore. Not sure how I didn't think of this before.
Noro Kureyon Sock: toes
I now have 8 pairs of handknit socks for myself. Eventually I'd love to have an entire month's worth. I wonder how many more I'll manage to knit for myself this year?


P.S. Thank you again to Jillian for gifting me with this gorgeous yarn!

Friday, October 26, 2007

S'mores cupcakes and wooly warmth

I've been so busy for the past few weeks. Besides producing the new podcast episode, I was also getting ready to fly home for a visit. My husband was leaving for a work-related thing that would take him away from home for about a month, and so I scrubbed my house from top to bottom (with the help of my friend Jillian!), and packed up myself and the kids and flew back to NY on Tuesday.

Anyway, that's my reason for not showing you this earlier.
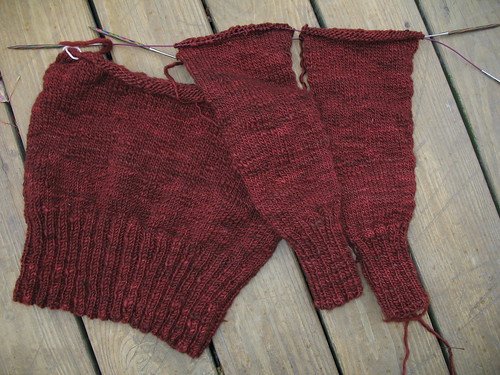
Button Me Up in progress
It's the Button Me Up pullover from Cosmic Pluto, and I'm knitting it out of Handpaintedyarn.com Handspun Bulky in Wine Red. I sort of feel like a cheater because I'm using handspun that I didn't personally spin, but I'll get over it. I love the color; it's the perfect shade of burgundy.

I cast on for this a few weeks ago and was just starting the sleeves when I suddenly realized something -- I was going to run 2 skeins short, because I hadn't read the pattern carefully enough! (Pattern calls for 4 skeins in MAIN color and 2 in CONTRASTING. I was knitting it all in one color, and...right. Just 4 skeins.) I went on the Handpaintedyarn.com site to buy the two more needed, and found that they had sold out of the color! I really didn't want to rip everything back to knit it in two colors instead, so I searched around on Ravelry to see if anyone else had the same color that they'd be willing to sell me.

Two different people suggested emailing the yarn company to see if they had some extra in backstock that they just hadn't entered in the system. I did that, and as it turns out, there were 6 extra skeins just sitting there, unlisted!

I immediately ordered what I needed, and had it shipped to my mom's. It arrived yesterday, and I'm going to work on this exclusively until it's done.

This'll be my first "real" sweater that I've knit for myself, and I'm so excited to be able to actually wear it! It's been nice and chilly here too, so I'm sure that I'll get plenty of opportunity.

In other news, I finally blocked this.
Nightshade Canopy Shawl
PROJECT SPECS:
Pattern: Nightshade Canopy Shawl by Susan Laurance.
Needles: Size 9 KnitPicks metal interchangables
Yarn: My own handspun worsted/bulky, roving dyed by Amy of Spunky Eclectic
Notes: I will definitely knit this again -- probably a little bigger, in thinner yarn. It was a simple and satisfying project, and the pattern is well written and clearly laid out. I would recommend this for a first-time shawl project.

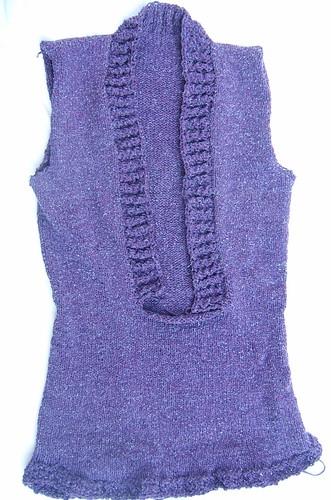
While in route to Paris, I worked on Sahara, and this is as far as I've gotten:
Sahara so far
Since it's been so grey and cold out, I've just been having a hard time finding it in myself to work on it. All I want is to snuggle into warm, thick, wooly goodness. Silk and rayon just haven't been pushing my button as of late.

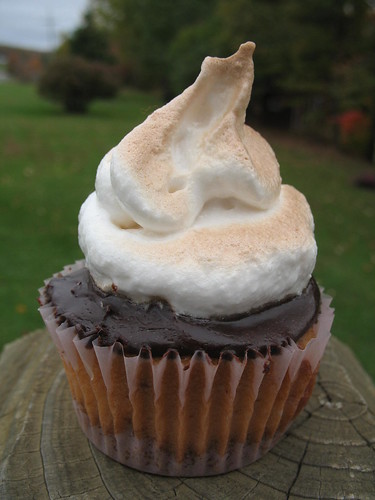
Yesterday, I made S'mores Cupcakes:
S'mores Cupcake
Cupcake recipe from Cupcake Bakeshop, marshmallow frosting from Yumbrosia. At Cupcake Bakeshop, Chockylit filled the cupcakes with marshmallow fluff, but I didn't want to loose any of the graham crackery goodness, so I decided to spread the ganache over the top like she did, and then to pile on some marshmallowy meringue on top (piped out of a plastic bag with corner snipped off). My little sister (9-year-old Rachel) helped me with the double-layer frosting, and we had quite a fun time in the kitchen together.

Chockylit found that her cupcakes didn't quite rise and shrunk while cooling, and I had the same experience. I didn't think that it affected the overal quality of the final product though, so it was fine. Next time, I'd add less butter as she suggested to see if that helps any.

They've been a big hit with everyone who's tasted these so far. There's a buttery graham cracker crust on the bottom, and then a graham cracker-laced not-too-sweet cupcake. The ganache is bitter dark chocolate, which contrasts nicely with the fluffy, supersweet billowy topping. I tosted them under the broiler as a last step (with oven door open, of course!), which really took them over the top. I was going to stick a square of chocolate into the marshmallow frosting, but decided to stop while I was ahead.

Monday, October 01, 2007

A purple hat and some tasty bread

In my order from KnitPicks that I received last week, there were three balls of their worsted weight pima cotton/merino blend (75%/25%), Main Line. I've been wanting to swatch this stuff ever since they came out with it last year. Since my knitting moments are all too often precious and few, what better way to redeem the time than by turning my swatch into a hat? (I will post the pattern later on today or tomorrow.)

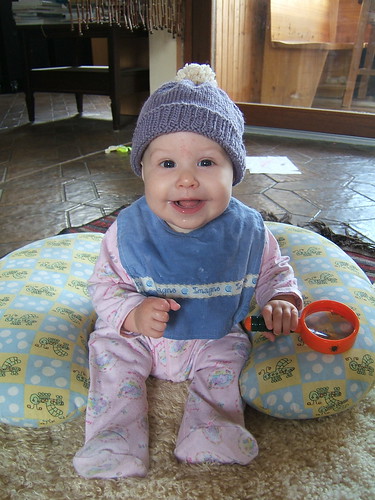
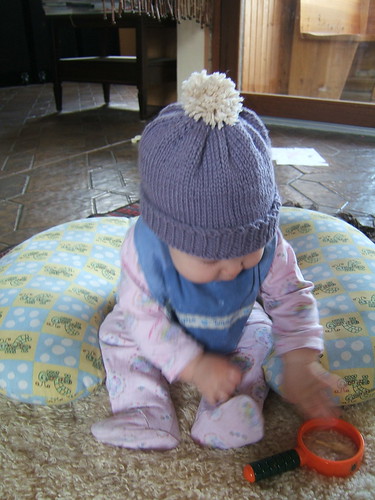
Daisy's hat 3
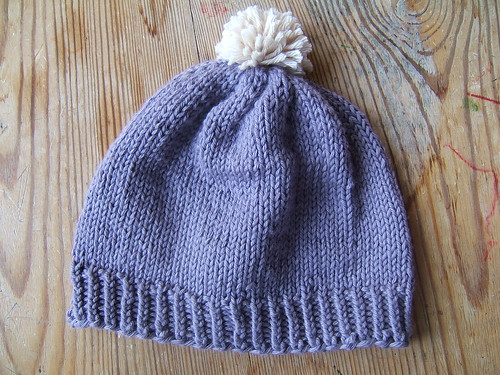
This took exactly one ball of Dusty Lavender, with extra in Natural for the pom-pom.
Daisy's hat 2
I had embroidered bubbles on it, but then when I tried it on Daisy's head, the hat was a little too big, and has to be folded up for now. The bubbles got lost in the folded brim, so I'll have to save that idea for a later date.

Here is the hat, unfolded.
Daisy's hat
I love the fact that the cotton makes it just a little cooler, which is perfect for early fall and spring, and the Merino adds just enough bounce to make this easy to work with. My stitches were crisp and even, but the yarn felt soft and didn't abrade my hands the way 100% cottons often do.

I will probably order more to knit a little cardi to match, because I have a feeling that this will wear well.

My only complaints about this yarn is that they come in slightly skimpy 82 yard balls. At $3.29 per ball, that brings the price for an average, medium sized woman's cardi up to $49.35. Not exactly the bargain basement prices that I expect when I think of KnitPicks brand.

A few days ago, I found this recipe for Potato Parmesan Bread over at food blog, Baking Bites. I've always loved potato bread, and had to give it a try.

Starch from mashed potato feeds the yeast, giving it an extra boost for a nice airy loaf.
Potato Bread Loaf
I made a few changes by adding Vital Wheat Gluten and some extra butter, substituted Romano for the Parmesan, bread flour for the all-purpose, used two red boiling potatoes instead of the one russet, used the cooking water from the potatoes, and heated the milk. I divided it unto two loaves instead of one, which allowed me to cut the baking time. I set the loaves on parchment covered baking sheets to rise, which I then slid onto a preheated baking stone to bake. All changes are reflected in my adapted recipe, below.

Happily, the bread rose high and lofty, with a moist interior. The cheese adds a surprisingly subtle note and lingers just a bit on the aftertaste, and the bread is equally good plain, or with butter and jam.
Potato Bread Slices
I would like to experiment with substituting cheddar, and adding some whole wheat to make this a little hardier. Bulgar wheat would also add a nice crunch -- I might try that as well.


Romano Potato Bread

2 red boiling potatoes (or enough potato to equal 1 cup when mashed. Potato flakes = OK)
4 tbsp butter (1/2 stick)
1 cup milk, heated to about 110-115 deg. (low fat is fine)
1 Tbsp active dry yeast
1 Tbsp sugar
2 tsp salt
1/2 cup potato water (reserved from water drained from cooking potatoes. Add extra water if needed)
1 Tbsp Vital Wheat Gluten
4-5 cups bread flour
1 cup Romano cheese, grated
1 egg + 2 tbsp water (for egg wash)

Peel potato and cut into small, even chunks. Boil potato pieces in a small saucepan until tender. Drain and reserve cooking liquid and completely mash potato (a ricer works well here, or you can force through a fine strainer) until smooth. Transfer potato to a large mixing bowl and stir in butter and milk, mixing until well combined. Mixture should be between 110 and 115 degrees, or the yeast will not activate properly.

Stir active dry yeast and sugar into the potato mixture. Let stand for 5-10 minutes, until mixture is slightly foamy. Add in salt, water, Vital Wheat Gluten and 3 cups of flour. Mix until smooth, either stirring with a wooden spoon or using the dough hook attachment on an electric stand mixer. Stir in Romano cheese and gradually add in additional flour in 1/4 cup increments until dough comes together and pulls away from the sides of the mixing bowl. If using an electric mixer, continue to knead at medium speed for about 5 minutes until dough is smooth and elastic. If mixing by hand, turn the dough onto a lightly floured surface and knead for 5-7 minutes, until dough is smooth and elastic.

Place dough in a lightly oiled bowl, cover with waxed paper or damp towel and let rise for 45-60 minutes, or until doubled in size.

TIP > If you live in a low-humidity environment, have dry heat in the house, or just want to aid rising process: heat oven on very low and then turn off. Place dough in a heat proof bowl and put in center rack of oven, covered by waxed paper or towel. Place a pan or bowl of boiling hot water in bottom of oven. Steam + gentle heat speeds the growth of the yeast.

Turn dough out onto a lightly floured surface and gently deflate. Cut in two. Shape into two long, oval loaves and place on a parchment-lined (or generously sprinkled with cornmeal) baking sheet. Cover with a clean dish towel, and let rise for 45 minutes.

Meanwhile, preheat the oven to 375F, with large baking stone inside, if using.

Stir together egg and water with a fork and lightly brush mixture over the risen loaves.
If using parchment paper, slide onto hot stone in center of oven. Bake for about 30 minutes, until bread is a dark golden brown and the bottom sounds hollow when tapped. An internal read thermometer inserted into the center of the loaf will read 195-200F.

Transfer loaf to a wire rack to cool.
Cool completely before slicing. (Or don't, but it won't slice as neatly.)

Makes 2 medium sized loaves.

Tuesday, May 29, 2007

My Green Gables (and the rogue Niddy-Noddy)

Anne of Green Gables was (and still is) a childhood favorite. I think that I read through that book at least 5 times, and then maybe once through all of the following ones in the series. I always got this very special, "home" like feeling when reading. Someday I'm going to purchase the whole set of books to read to the children when they're a little older.

It is perhaps for that reason that I waited for so long to spin this particular Spunky Club colorway, Green Gables. I wanted to wait until I really knew what I was doing, so that I could do it justice. Well that, and also Green is my favorite color. (Closely followed by blue, yellow, and pink.)

I started with a beautiful 4 oz bump of semi-solid superwash Merino roving from the Spunky Club (April, '06). I wanted the bits of yellow to appear in little blips throughout, maintaining the "semi-solid" feel, and not have any seriously bright yellow stripes (I adore yellow, but sometimes things just need to be muted down a bit). In the photo below, you can see the three stages of color organization and drafting, from the left: I split it into thirds horizontally as equally as I could, than stripped it vertically as thinly as possible into long pieces. The pieces were then drafted out, rolled into balls, and stored until I was ready to use them.
DSCF6664
I spun three bobbins up, and apparently I wasn't as even as I thought, because there was a whole lot left on two bobbins after the one ran out. I didn't want to Navajo-ply the remainders, because then that would concentrate the color into strips, making the yarn completely different from the other three ply. Instead, I decided to just ply the two together for a laceweight.

Fingering weight, with quarter for scale:
DSCF6826
Laceweight, with quarter for scale:
DSCF6824
The top skein is 352 yards of fingering weight 3-ply, and the bottom is 134 yards laceweight 2-ply.
Green Gables
I was so pleased, because when plied, it makes a fairly consistent fingering weight (some parts a bit thinner).

I spun the singles (long-draw method) pretty tightly, then plied it firmly to make a tough sock yarn.

Merino has a short staple with not a whole lot of crimp, so the thinner and more tightly it's spun, the less likely the individual fibers are to drift out and cause fuzzing, pilling and general wear. Also, 3-ply yarn wears harder than 2-ply, which is why I took the time to spin up three bobbins worth. If I'm going to take the time to spin the yarn, knit the socks, than walk all over in them, they'd better last! (I'm also going to knit the toes and heels in a smaller needle to help with the wear factor as well.)

The laceweight is just enough for a perfectly "spring" leaf-lace ascot or open, breezy headscarf.

Something kind of funny -- when I purchased my niddy-noddy, I was certain that I had chosen the 1-1/2 yard one. I was always kind of frustrated with myself for doing so, because it makes the math a little trickier. I was also frustrated, because no matter how thinly I would spin, I wouldn't get the expected yardage out of a 4 ounce hunk of roving. Last night, I finally decided to wind a piece of yarn around it, then lay it out flat and measure. Two yards. Whoops. Well, that's a relief. (And I feel just a bit addled in the head, but, you know.)

I think that Anne would be proud.

Now to cast on!

Monday, May 14, 2007

Daisy's fashion shoot, part 1

The socks are done! I've decided that, besides the Sockapalooza socks I'll be knitting for my pal, I'm only knitting for myself right now. I need a little bit of spoiling from time to time, and that time is now.
These are the most comfortable pair of socks I've knit for myself thus far, although I wouldn't have known it by the way the pattern looks. It's so stretchy though, and fits perfectly. This project did have it's share of headaches though. I don't think I really blogged about it, but I had to knit the toe on one of the socks 5 times, and twice on the other. This has never happened to me before. Maybe I'm distracted, maybe my row gauge is WAY off, but in the end, I knit 4 extra pattern repeats, didn't knit any of the 4 plain rows before the toe decreases, and now they fit like a dream. Just like that. (BTW, my feet are size 8-1/2, so similarly sized knitters, be forewarned.)

Let's take a little closer look at that pattern:
This picture is exactly true to color -- the one above is just a bit dark.

PROJECT SPECS

Pattern: Child's French Sock from Knitting Vintage Socks by Nancy Bush
Yarn: Lorna's Laces in Grapevine
Needles: Susan Bates, aluminum DPN's, set of 4
Notes: 5 extra pattern repeats, for a total of 25 from cuff to toe. Did not knit the 4 plain rows between last pattern rep and decreases for toe.

Yesterday, I wound up the yarn for this project:
And I got this far:
I love colorwork. It's like painting with yarn. Once I got into the rhythm of reading the charts and using both hands to wrap and throw each color, it became almost meditative. There's nothing fast about it though, and we're going to be watching a lot of movies this week, since my husband has a bunch of days off. So I'm probably going to cast on for something simple tonight as a Movie Knit.
Here, Daisy models (unwillingly) some of her handknits:
Booties: Ribbed Cuff by Fiber Trends
Hat: Rosebud (with no rosebuds) from Itty Bitty Hats

Hat: Bunny Ears (modified as "Bear Ears") from Itty Bitty Hats
Booties: Berry Baby Booties by Rachel Abrams

These were knitted by my blogging partner Sarah when Max was born. Unfortunately he was born with huge feet, and they never fit him. I'm not sure where she got the pattern, but they're so cute!

Just so that you don't think Daisy just wails non-stop, here's my current view:
Just kissable.

More knits will be modeled in the next post.

Wednesday, May 02, 2007

Sparky Socks and the Named Baby

On Sunday, I completed the Sparky Socks that have been hanging out on the needles all month.
PROJECT SPECS

Pattern: Based on Easy Toddler Socks (PDF) by Karen Coron.
Yarn: Online Euro Yarns, Green/black/brown from the Sierra colorway line (I bought it down the street, but you can get some of the other colorway lines at The Loopy Ewe)
Needles: Knitpicks Classic Circulars, size #1. Knit two socks at the same time with Magic Loop technique (nothing magic about it, kids, once you start a pair, it just makes sense and it's very simple.)
Notes: I really like that this pattern uses a heel flap. The socks fit Sparky very well, and I don't think they'll slip right off of him like the short-row heels that I've knit for him in the past.
Thoughts on the yarn: I bought this yarn because it was inexpensive, accessible (down the street!), and I was in the mood for some self-striping mindlessness. As it turns out, this yarn not only knit up prettily, but it's also softer than I would have thought. I can tell that this is going to wear very well, similar to Lion Brand Magic Stripes, but with none of the stiffness. I will certainly knit with this again. (I've already got a purple color for myself.)

Some fun stuff came in the mail yesterday:
But you'll have to wait until tomorrow to see what's in it. (No, I'm not being mean on purpose, but I haven't taken pictures of the contents yet.) (OK, so I'm being a little mean, and by now, I could have had the time to get my camera out and snap a few shots, but...right. Tomorrow it is.)

And now, regarding the baby naming contest:

I introduce to you
My tiny Daisy.

(Photo taken just before my brother and sister left to go back to the States)

Winning entry was suggested by (blogless?) Jessica. Daisy is not only April's flower, but it also represents "innocence", and it even sounds great with Sparky and Max.

Runners up were Susanne (also blogless?), for most heartwarming entry (her two sons got in on the contest and had their own suggestion of Princess Leia from Star Wars), and Chase, for most names (22!) submitted.

Thanks to everyone who entered, it was so much fun reading everyone's suggestions! I'm contacting the winners for their addresses, and yarn preferences. (Chase, no worries, just candy for you.) Prizes will be mailed out by the end of the week.

Reader question: Jessica wanted details on my baby sling, I sew my own. You can purchase sling rings at slingrings.com or nestmom.com. Nestmom is less expensive, but there are also less choices. The best info I've found on DIY slings is here. (By the way Jessica, hurray for Wonderful Wallabies!)

Saturday, April 28, 2007

Quilted (?!)

Has anyone heard about the Slow-Poke Socks Knit-Along? I read about it at my friend Becca's blog, and it sounds like just the thing. (By the way, check out Becca's stranded socks! While unwearable, they are quite pretty! If nothing else, it's a good lesson on functional vs. unfunctional colorwork.) I just joined today. I'm suddenly obsessed with knitting socks for myself. In the past I've mostly knit them for others, but I realized last week that I need an entire drawerful for the fall and winter, and have been buying sock yarn accordingly. I know, bad, bad me.

Yesterday was my first full day alone with the three children. It was challenging, and I'm sorry to say that I appear to have less patience than I had remembered, but we managed, and even had some fun moments.
In the morning, we went out with out brand new double stroller to mail something at the post office. There were rocks thrown in the stream, some ice cream was consumed, and the tiny one slept through it all.
I'm still considering all of the entries for the Name That Baby contest, so if you have something that you haven't suggested (even if you've commented already), I'm still open for suggestions. There have been a few though that I really like, so I will probably announce a winner over the weekend.

Especially of interest to Aunt Susie:
Yes, I quilted! It's my first quilt, which rounded out the birthday gift for my little sister Rachel. It's the perfect size for the Knitted Babe that I gave her last year.

I pieced it together without having a real plan, trimmed the blocks to square them off, then seamed them without worrying too much about lining things up. I'm sure that you can tell. I think it's kind of cute though, in a quirky way.

This is the backing. As you can see, I've machine quilted it in a zig-zag pattern, as much for convenience as for any other purpose.
I'm happy to report that Rachel loved it, and her doll can often be found tucked into bed, cozy under her new quilt. (These pics were snapped off before they left on Thursday.)

There was some fiber activity yesterday that involved spinning, but I would like to devote an entire post to fiber preparation, so I'll save that for another day. For now, I'm off to get my hair cut. I hope that the hairdresser speaks enough English for us to communicate...should be exciting! (I must note that yes, I do realize I should be learning more German and not expecting others to make up for my lack. However, as it stands, I still know very little, so...there you go. I know that this is terribly American of me, and I shall try to rectify it as soon as possible.)

Friday, March 30, 2007

Argosy complete

Thanks for all of your amazed and encouraging comments about my intense curves. =) Nine days until the due date!

Yesterday, I spent naptime recording the podcast, and completed an episode. Very unfortunately, the entire episode bit the dust when our power went out. Hopefully I'll get a chance to record sometime this weekend, or Monday. Of course, if I don't go into labor first.

Moving on to brighter things:

Argosy is done! It's actually been blocked since last Friday and I've been wearing it often, but I'm just getting around to posting pictures.

As you can see, I've blocked out the edges all pointy, because that just seemed like a good idea to me. I do realize that the pattern calls for a more blocky look. Maybe if I ever have to wash it, I'll block it differently if I'm in a different mood.

I knit 29 repeats, and although it's lacy and light, thinly spun BFL, it feels so cozy and warm wrapped around my neck twice and tied.

As you can see in the picture though, we've had a few days that are rather warm, which of course is the rule for whenever you finish something cozy that you particularly like.

PROJECT SPECS
Pattern: Argosy
Yarn: Berry Pickin' BFL from Spunky Club, handspun by me into a DK weight 2-ply.
Needles: size #6 KnitPicks Options circulars
Cast-on to cast-off: the knitting of this took me about 4 days, and then a day to block.
Notes: This was easy to knit, easy to memorize lace pattern. I would recommend this for those beginning to learn how to read a chart, and knitting lace.

Husband Socks update: I've now got 7 inches into the cuffs, and still the yarn does not run out. Holy. Crap.

Saturday, March 24, 2007

Fat Bottom Bag

PROJET SPECS
Pattern: Fat Bottom Bag by Julie Holetz from The Happy Hooker by Debbie Stoller.
Yarn: Bernat Handicrafter Cotton (no idea how this cotton differs in any way from Sugar and Cream or Peaches and Cream) in Hot Pink.
Other materials used: Leopard print stretch twill for lining, cotton Amy Butler print for fabric yo-yo flower, pink-and-brown argyle printed ribbon. Wooden handles "rescued" from thrift store bag.
From start to finish: Two days.
Pattern notes: Bag is worked side-to-side, and is very simple.
Modifications: I decreased a little more for the purse flap, because my handles were so much smaller than the ones reccomended in the pattern. I slip-stitched the handle flap closed around the handles instead of sewing them.


I love it when something is done so quickly that I don't even have time to post about it. Somehow, I always forget just how quickly crochet goes. I started the bag yesterday, and was done with it, embellishments and all, by this afternoon. Crazy.

One of my little sisters is turning 9 in a few days, and just so happens to be coming to visit, so she needed something extra special. When I was flipping through The Happy Hooker the other day, this bag stood out to me and I realized that I just had to work it up.

Let's take a quick look at the interesting construction of this bag.

First, it's crocheted sideways, with increases and decreases in the beginning and end to give it a little bit of a cupped shape.

I thought that I was doing something wrong until I was about half-way through, and then I "got" it. Aha. Right. It would have been helpful if the pattern notes mentioned the whole sideways thing.

Then you pick up stitches from each long edge, and bunch them up with single crochet decreases all along.
(That's obviously after I've only done one side.)

The directions say to break yarn after crocheting the handle flap, then go back to sew it down over the handle. I thought that was needless, since a good slip stitch can do the trick with a more "finished" looking result. And I had the crochet hook in my hand anyway, so...

The handles are much smaller than called for, but they were the only ones I could find at the thrift store -- attached to a rather ugly bag, and only a dollar!

Of course, I realize that crocheted and knitted objects have a tendency to stretch, and things can fall through and all, so I dove into my little fabric stash, and came up with this.
Can you see the little pocket? I added it to the lining before the lining was sewed into a pouch shape -- always much easier than trying to sew it in later!

I paid a lot of attention to the details when finishing this. All of my hemmed edges are folded under so there's no raw parts, no threads to come loose, and it all has a very clean effect.

On the outside (as you saw in the first picture), I created a fabric yo-yo flower and stitched it in place over some brown-and-pink argyle ribbon that I wove through the top of the bag.

I love every over-the-top girly feature of this bag. Rachel's birthday is always fun, because it's the only time that I really get to go all out "little girl" with my projects, and she appreciates them to the fullest. It only happens once a year, so I look forward to brainstorming each time. There is one or possibly two more things that will be created for her in the following days before she gets here next week.... and none of them involve knitting (gasp!)

Since this is a knitting blog, here's a pic of the Husband Socks, which, until yesterday, were taking a time-out for bad behavior.

They're back on the needles now, so I'll post progress soon.

Tuesday, January 23, 2007

Winter wear

ETA link to PDF pattern for hat. Thanks Susan!

The other day as I was putting on my scarf and hat to take a walk, I realized that I was wearing some finished objects that I'd never blogged. (Oh the horror!) =) So, without further delay, here they are:

/
PROJECT SPECS
Pattern: Live Dangerously Don't Swatch Hat by Susan Pierce Laurence-- a top down hat perfect for when you don't know how far your yarn will go.
Would definitely knit this again. I paid for the PDF version of this pattern. If you are like me and enjoy neat, tidy patterns with no guess work, you should consider buying it. I think it cost me $3, which was well worth it. I can already tell that I'll use this pattern again and again.
Needles: Size 15 Boye Interchangeable circulars (hate 'em. Stiff cables and the needles unscrew, no matter how tightly I put them on.)
Yarn: My own handspun; bulky to polar weight, thick and thin. Wool and silk, sari silk.
Cast-on to cast-off: I knit this up in about two days... then ripped it out because it was huge...than knit it back up in two days. So I'd say this was a two-day knit.
Modifications: This hat was knit plain after the increases, and when I was nearly out of yarn I purled to create a turning row, and then knit a lining in Knit Picks Panache to make it incredibly warm and soft. When I had knit the lining up as far as I wanted (about 4 inches -- didn't want to risk an itchy hat!), I used a three-needle-bind-off to secure the live stitches to the inside of the pink wool. I love the way it turns out. Wind doesn't stand a chance against this baby. The only thing that slightly bothers me is that the edges flip out just a bit, because I should have bound off to a row or two above the one that I did. My sister Hannah said that she likes it though because it "gives it character". My husband says it looks sloppy. Ah well.
Notes: I used Eunny's circular cast-on to start this hat off, instead of Emily Ocker's, and it was very simple with a great looking result. (Who would expect any less from Eunny?)


/
The hat happens to go perfectly with my maternity jacket, as well as my Norovember project, which I never showed completed...

PROJECT SPECS
Pattern:
Danica by Jesse Loesberg
Needles: Plastic straights, size #8
Yarn: Noro Kureyon, color #170
Cast-on to cast-off: Can't remember, because there was a lot of stop-start action. First I ran out of yarn and had to order more. Then after blocking I realized I'd knit it too long and had do rip back and reknit the end.
Notes: Kureyon is often maligned for being scratchy and harsh. However, if you soak it in a sink full of warm water with a little bit of hair conditioner, it becomes lovely and soft. I have had no problems with this being right against my neck, and I have very sensitive skin.
I'd never done Entrelac before, but the technique was totally addictive, and I couldn't stop myself from knitting this.

/

Thank you so much for the comments on the boys sweaters, as well as all of your well-wishes for my "motherly health". I have gotten way too far behind on podcast and blog comments to catch up, especially with the state of my brain lately (how do in-utero-babies manage to steal so much memory?!), so I will say a cover all "thank you". It really means so much to me that there are so many of you waiting eagerly for a new podcast. I can't wait to get started again after this much needed break. I expect the blocking wires to come in the mail any day now, and as soon as my Swallowtail Shawl is all blocked out, I'm back at the mic. I've got so much to share with you all, as well as a brand new "book review" segment!

If there was anything pressing that you emailed me about, please contact me again, and I'll try to get back to you right away. =)

Thank you so much for your patience!

Wednesday, December 13, 2006

What I've been doing...

If you're my sibling or parent, do not read the rest of this post.


Remember the Super Secret Crochet Project that you were all guessing at last week? MA was right, and I think that Laura (not Laura P, the other Laura) guessed correctly too. It was beanie bags.
Photobucket - Video and Image Hosting
Brief project specs
Yarn: Peaches and Cream cotton (worsted weight yarn)
Hook: aluminum size F
Pattern: my own. Sew up a little pouch out of cotton. Fill with beads. Sew closed. Crochet a circle, increase as needed until it looks like the right size, then crochet in the round until almost to the top of the bag (for the 3x3 bags I worked 18 stitches, the 4x4 were 28 stitches). Decrease about the same rate you increased until the hole is closed up in the top. Weave in ends.
From start to finish: about 2 weeks, since I put off weaving in ends until I had to wrap them up to mail. =)


Ten, to be exact. There were supposed to be 20, but I ran out of beads. The one store I know of here that sells craft supplies tends to be a little expensive, and also the boys don't usually act very well inside (too much cool stuff to grab and throw for Max, and Sparky has a melt-down when we have to leave, because he could easily live in those aisles of the store). So. I only had enough for 10. They're for my little brothers. Last year, I crocheted them one Liger, which, surprisingly I have no pictures of (was going to make two, but the first turned out so desperately ugly that I couldn't bear to make another -- they loved the idea of it, but weren't crazy about the end product either, so it was just as well), and then 3 beanie bags on a whim. I figured that whatever they liked better, I'd make more of.

The beanie bags were better received than I could have hoped. They LOVED them and played with them all the time until some how all three got lost. It was ok, because the design was bad; beads kept escaping out of the crochet holes, even though I'd worked them up rather tightly.

I kept meaning to make them more, for Easter, for their birthdays, for Thanksgiving... Finally, I decided to make them a whole bunch for Christmas. So that's the story. My mom said that they'd still think they were cool, even though it's a year later. Christopher and Joel are 11 and 13.

Next up: a project worked up in three days, my new sock record.
Photobucket - Video and Image Hosting
Project specs
Needles: size 5 DPN's
Pattern: Thuja
Yarn: Lorna's Laces Shepherd Worsted Solid (although it's actually semi-solid -- perfectly subtle and lovely)
Modifications: 3 inch cuff, and shortened overall length of foot to fit a woman's size 8.
Cast-on to cast-off: Dec 1st - Dec 3rd
Notes: Love this pattern. It's the second time I've knit them. Also, I adore the yarn. I need to buy more to knit mittens for me. It's squishy, soft, and tough. The colorways available are also amazing. I am completely in love with semi-solids now. (Multi-colors have been bothering me for some time, but I've been knitting with them anyway to deal with stash.)

These are a shorter version of Thuja. Thuja Footies, I guess. They started out as One Skein Cabled Footies, but I ran into some issues with the pattern (will cover them in my next podcast on Saturday). These have a 3 inch cuff, but I could have easily gotten 5 or 6 inches. I've got a lot of yarn left over -- Lorna's Laces Worsted has quite good yardage. A tiny bit pricy, but completely worth it.

I highly reccomend this pattern for new sock knitters. It's fast, simple, but has nice results.

I always like to include washing instructions and fiber content, so here's the fly-by-the-seat-of-my-pants "professional" looking label they got mailed in:
Photobucket - Video and Image Hosting
They're for my mom, who can expect handknit socks for every occasion for the rest of her life, since she has proved appropriately appreciative of the beauty and comfort of them. (She's actually expressly asked to only receive these now, so how can I refuse?)

I've also been getting quite a bit of mail...that eBay, I tell you. It's all about shopping in your underwear.
Photobucket - Video and Image Hosting
More on the contents at a later date. I'm not completely prepared to speak about my purchases.

This little guy deserves a post of it's own, but here's a peek at something really cool I did last week:
Photobucket - Video and Image Hosting

And last night, while watching a supremely stupid movie (Talladaga Nights), I redeemed the time by finishing this:
Photobucket - Video and Image Hosting
Sarah is right. Noro matches everything.

Project specs
Needles: Plastic (!) Susan Bates size 8
Yarn: Noro Silk Garden, 2 skeins
Pattern: One Row Handspun Scarf by Stephanie Pearl McPhee
Modifications: I made this a keyhole scarf by knitting 29 inches of the pattern as written, then knit back and forth on half the stitches only for 3 inches (10 garter-stitch ridges or 20 rows). I broke the yarn and joined where I'd left off on the other half of stitches, and worked those for 10 ridges. On the next row I knit all the way across, and continued the pattern as written until I ran out of yarn. It ended up being the Perfect Length -- almost the same length on both sides when I have it on, as you can see in the picture. It's the most practical scarf I have, because it can't blow off or be shifted around by a small person.

Currently ripping back 32 inches of Danica, and I've cast on for the Mr.'s Christmas gift. More details later.

I'm going to be working furiously on Christmas things and then my sister Hannah is coming on Saturday to stay until after Christmas, along with possibly some other siblings, so I'm not sure how much I'll be blogging. I really want to show you some Christmas decorating stuff, including our very first tree (!!!), so I'll try my best.

Look for my End Of The Year podcast coming out on Saturday! In the meantime, be sure to check The Knitting Cook podcast blog every day this week for yummy recipes that are perfect for Baked Goods Gifts.

LinkWithin

Related Posts Plugin for WordPress, Blogger...