Friday, October 26, 2007

S'mores cupcakes and wooly warmth

I've been so busy for the past few weeks. Besides producing the new podcast episode, I was also getting ready to fly home for a visit. My husband was leaving for a work-related thing that would take him away from home for about a month, and so I scrubbed my house from top to bottom (with the help of my friend Jillian!), and packed up myself and the kids and flew back to NY on Tuesday.

Anyway, that's my reason for not showing you this earlier.
Button Me Up in progress
It's the Button Me Up pullover from Cosmic Pluto, and I'm knitting it out of Handpaintedyarn.com Handspun Bulky in Wine Red. I sort of feel like a cheater because I'm using handspun that I didn't personally spin, but I'll get over it. I love the color; it's the perfect shade of burgundy.

I cast on for this a few weeks ago and was just starting the sleeves when I suddenly realized something -- I was going to run 2 skeins short, because I hadn't read the pattern carefully enough! (Pattern calls for 4 skeins in MAIN color and 2 in CONTRASTING. I was knitting it all in one color, and...right. Just 4 skeins.) I went on the Handpaintedyarn.com site to buy the two more needed, and found that they had sold out of the color! I really didn't want to rip everything back to knit it in two colors instead, so I searched around on Ravelry to see if anyone else had the same color that they'd be willing to sell me.

Two different people suggested emailing the yarn company to see if they had some extra in backstock that they just hadn't entered in the system. I did that, and as it turns out, there were 6 extra skeins just sitting there, unlisted!

I immediately ordered what I needed, and had it shipped to my mom's. It arrived yesterday, and I'm going to work on this exclusively until it's done.

This'll be my first "real" sweater that I've knit for myself, and I'm so excited to be able to actually wear it! It's been nice and chilly here too, so I'm sure that I'll get plenty of opportunity.

In other news, I finally blocked this.
Nightshade Canopy Shawl
PROJECT SPECS:
Pattern: Nightshade Canopy Shawl by Susan Laurance.
Needles: Size 9 KnitPicks metal interchangables
Yarn: My own handspun worsted/bulky, roving dyed by Amy of Spunky Eclectic
Notes: I will definitely knit this again -- probably a little bigger, in thinner yarn. It was a simple and satisfying project, and the pattern is well written and clearly laid out. I would recommend this for a first-time shawl project.

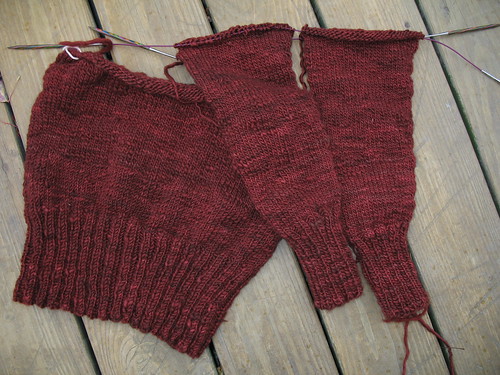
While in route to Paris, I worked on Sahara, and this is as far as I've gotten:
Sahara so far
Since it's been so grey and cold out, I've just been having a hard time finding it in myself to work on it. All I want is to snuggle into warm, thick, wooly goodness. Silk and rayon just haven't been pushing my button as of late.

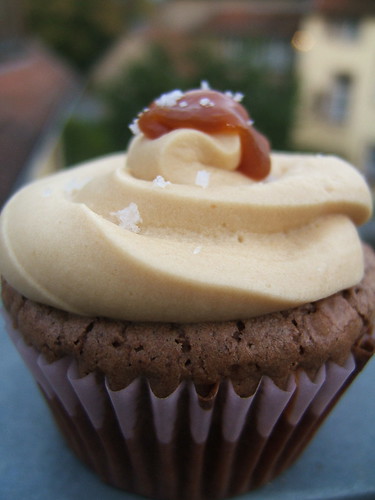
Yesterday, I made S'mores Cupcakes:
S'mores Cupcake
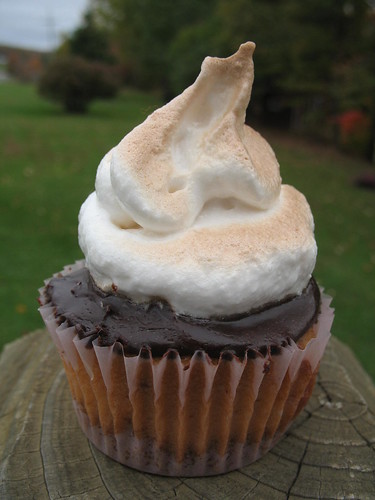
Cupcake recipe from Cupcake Bakeshop, marshmallow frosting from Yumbrosia. At Cupcake Bakeshop, Chockylit filled the cupcakes with marshmallow fluff, but I didn't want to loose any of the graham crackery goodness, so I decided to spread the ganache over the top like she did, and then to pile on some marshmallowy meringue on top (piped out of a plastic bag with corner snipped off). My little sister (9-year-old Rachel) helped me with the double-layer frosting, and we had quite a fun time in the kitchen together.

Chockylit found that her cupcakes didn't quite rise and shrunk while cooling, and I had the same experience. I didn't think that it affected the overal quality of the final product though, so it was fine. Next time, I'd add less butter as she suggested to see if that helps any.

They've been a big hit with everyone who's tasted these so far. There's a buttery graham cracker crust on the bottom, and then a graham cracker-laced not-too-sweet cupcake. The ganache is bitter dark chocolate, which contrasts nicely with the fluffy, supersweet billowy topping. I tosted them under the broiler as a last step (with oven door open, of course!), which really took them over the top. I was going to stick a square of chocolate into the marshmallow frosting, but decided to stop while I was ahead.

Saturday, October 20, 2007

Saturday, October 13, 2007

Spinning and Cupcakes

Last weekend we spent four days in Paris on a spur-of-the-moment trip. It was even more beautiful than I'd imagined it would be, and I'm still organizing the pics! More on that in a future post.

Yesterday, I had a few spinning friends over to play (Rachel, Dina, Gina, and Jillian). Most of us have children, and they all kept each-other occupied for a good deal of the time. Most importantly, we created a new spinner! My friend Jillian has been wanting to learn, and her husband is buying her a wheel for Christmas. The get-together was set up in part so that she could try out wheels and get a feel for things.

Here she is, spinning for the very first time, with Rachel's guidance.
Rachel (right) teaching Jillian

It's always interesting to watch other people spin. Similar to watching other people knit -- I always learn something from checking out someone else's technique. (Jillian is actually very happy and excited in this picture, but that's the serious look of deep concentration.)
Spinning!

Dina and Gina.
Dina and Gina

Spinning
Ever since I started reading the Cupcake Bakeshop blog, I've been looking for an excuse to use one of her recipes (her photographs make me feel like I could just reach out and eat one!). I finally got the chance!

Chocolate Cupcakes with Salted Caramel Frosting
Chocolate cupcake w/Salted Caramel Frosting

I knew that I would love them, but I wasn't sure how they'd go over with everyone else, especially the children.
Eating Cupcakes
I shouldn't have worried. (Dina's daughter "Nugget" on left, Rachel and "K" on right.)

Topped with a square of salted caramel and a sprinkle of Fleur De Sel
Chocolate cupcake w/Salted Caramel Frosting

I baked up half of Chockylit's recipe which supposedly should have given me only a dozen cupcakes, but even after overfilling the muffin cups (resulting in flat topped confections), I still turned out 15. I'm pretty sure I could have gotten 24 if I'd filled them half-way, like I usually do. Next time I'll make a little more frosting too -- I piped generous swirls out of a plastic bag (Ziploc bag with the corner snipped open), and ran just a little short. Here's the halved recipe that I used -- the only changes are that I've taken out the "gluten free" half of it (full credit to Cupcake Bakeshop):

Chocolate Cupcakes with Salted Caramel Frosting:

Cupcakes
18 regular cupcakes / 350 degree oven

3-1/2 ounces (100 grams) Valrhona 85% cacao (or any bittersweet chocolate)
1-1/2 sticks (171.5 grams) butter
1 cup + 2 Tablespoons (222.5 grams) sugar
4 eggs
1/2 cup + 2 Tablespoons (90 grams) flour, all purpose
2 tablespoons cocoa powder, unsweetened
3/4 teaspoon baking powder
1/8 teaspoon salt

1. Chop the chocolate and transfer into the bowl of a standing mixer.
2. Add the butter to the chocolate and place the bowl over a pan of simmering water. Stir until the chocolate melts and the butter is combined.
3. Remove from heat and stir in the sugar. Let the mixture cool for 10 minutes.
4. Measure out the flour, 2 tablespoons cocoa, 3/4 teaspoon baking powder, and 1/8 teaspoon salt into a small bowl.
5. Transfer the cooled chocolate/butter mixture to the electric mixer and beat for 3 minutes.
6. Add one egg at a time, mixing for 10 seconds between each.
7. Sift the flour mixture into the wet ingredients and mix to combine.
8. Scoop into cupcake cups only 2/3s full. Bake all the cupcakes at 350 F for 25 minutes or until a toothpick comes out clean.

Note: If the oven is not hot enough than these cupcakes may over-flow. One way to be safe is to either fill 2/3’s full or another trick I use is to preheat to 375, then drop the heat to 350 once I put the cupcakes in. I also rotate the pans after 15 minutes of baking. It is safe to gently move them at that point and I find the lower back of my oven to be a bit cooler.


Salted Caramel

2 tablespoons water
1/2 cup sugar
1 tablespoons light corn syrup
1/4 cup heavy cream
1 tablespoons butter
1/4 teaspoon lemon juice
1/4 teaspoon salt, kosher or sea

1. Combine the water, sugar, and the corn syrup in a deep saucepan and cook over medium heat.
2. Stir together with a wooden spoon until the sugar is incorporated.
3. Cover the saucepan and let it cook over medium heat for 3 minutes.
4. After 3 minutes, remove the lid, increase the heat to medium-high, and bring to a boil.
5. Do not stir from this point on, but it is important to carefully shake the pan so that one area of the caramel doesn’t burn.
6. Continue to cook until the caramel turns an even amber color then remove from the heat and let stand for about 30 seconds.
7. *** This is the dangerous part *** Pour the heavy cream into the mixture. Wear oven mitts, stand away from the pan, and be careful. The mixture will bubble up significantly.
8. Put the mixture back on the heat, and stir, again being careful. Add the butter, lemon juice, and salt. Stir until combined.
9. Measure 1/2 cup into a Pyrex measuring cup. Stirring occasionally, allow to cool until thick like molasses and warm to the touch, about 20 minutes.

Note: There was a small bit of extra caramel that I poured onto a small plate that I covered in aluminum foil and greased with vegetable oil. I transferred the plate to the freezer for about 30 minutes. I chopped the caramel quickly into squares (its starts to get soft) and topped each cupcake with a square.

Salted Caramel Frosting

1 stick butter
4 ounces or 1/2 package of Philly cream cheese
1 cup powdered sugar
1/2 cup salted caramel

1. Bring butter to room temperature by letting it sit out for 1 or 2 hours.
2. Beat butter and cream cheese at medium speed until creamy.
3. Add 1/2 cup of the salted caramel and beat to combine.
4. Sift powdered sugar a little at a time into the butter/cream cheese mixture and beat to combine. (Taste as you mix and add more or less to suite your specifications)
5. Chill to thicken up, if needed.

Assembly
1. Frost cooled cupcakes with a generous amount of frosting.
2. Sprinkle each cupcake with sea, kosher salt, or Fleur De Sel.
3. Top with a caramel candy, homemade or otherwise.

Monday, October 01, 2007

A purple hat and some tasty bread

In my order from KnitPicks that I received last week, there were three balls of their worsted weight pima cotton/merino blend (75%/25%), Main Line. I've been wanting to swatch this stuff ever since they came out with it last year. Since my knitting moments are all too often precious and few, what better way to redeem the time than by turning my swatch into a hat? (I will post the pattern later on today or tomorrow.)

Daisy's hat 3
This took exactly one ball of Dusty Lavender, with extra in Natural for the pom-pom.
Daisy's hat 2
I had embroidered bubbles on it, but then when I tried it on Daisy's head, the hat was a little too big, and has to be folded up for now. The bubbles got lost in the folded brim, so I'll have to save that idea for a later date.

Here is the hat, unfolded.
Daisy's hat
I love the fact that the cotton makes it just a little cooler, which is perfect for early fall and spring, and the Merino adds just enough bounce to make this easy to work with. My stitches were crisp and even, but the yarn felt soft and didn't abrade my hands the way 100% cottons often do.

I will probably order more to knit a little cardi to match, because I have a feeling that this will wear well.

My only complaints about this yarn is that they come in slightly skimpy 82 yard balls. At $3.29 per ball, that brings the price for an average, medium sized woman's cardi up to $49.35. Not exactly the bargain basement prices that I expect when I think of KnitPicks brand.

A few days ago, I found this recipe for Potato Parmesan Bread over at food blog, Baking Bites. I've always loved potato bread, and had to give it a try.

Starch from mashed potato feeds the yeast, giving it an extra boost for a nice airy loaf.
Potato Bread Loaf
I made a few changes by adding Vital Wheat Gluten and some extra butter, substituted Romano for the Parmesan, bread flour for the all-purpose, used two red boiling potatoes instead of the one russet, used the cooking water from the potatoes, and heated the milk. I divided it unto two loaves instead of one, which allowed me to cut the baking time. I set the loaves on parchment covered baking sheets to rise, which I then slid onto a preheated baking stone to bake. All changes are reflected in my adapted recipe, below.

Happily, the bread rose high and lofty, with a moist interior. The cheese adds a surprisingly subtle note and lingers just a bit on the aftertaste, and the bread is equally good plain, or with butter and jam.
Potato Bread Slices
I would like to experiment with substituting cheddar, and adding some whole wheat to make this a little hardier. Bulgar wheat would also add a nice crunch -- I might try that as well.


Romano Potato Bread

2 red boiling potatoes (or enough potato to equal 1 cup when mashed. Potato flakes = OK)
4 tbsp butter (1/2 stick)
1 cup milk, heated to about 110-115 deg. (low fat is fine)
1 Tbsp active dry yeast
1 Tbsp sugar
2 tsp salt
1/2 cup potato water (reserved from water drained from cooking potatoes. Add extra water if needed)
1 Tbsp Vital Wheat Gluten
4-5 cups bread flour
1 cup Romano cheese, grated
1 egg + 2 tbsp water (for egg wash)

Peel potato and cut into small, even chunks. Boil potato pieces in a small saucepan until tender. Drain and reserve cooking liquid and completely mash potato (a ricer works well here, or you can force through a fine strainer) until smooth. Transfer potato to a large mixing bowl and stir in butter and milk, mixing until well combined. Mixture should be between 110 and 115 degrees, or the yeast will not activate properly.

Stir active dry yeast and sugar into the potato mixture. Let stand for 5-10 minutes, until mixture is slightly foamy. Add in salt, water, Vital Wheat Gluten and 3 cups of flour. Mix until smooth, either stirring with a wooden spoon or using the dough hook attachment on an electric stand mixer. Stir in Romano cheese and gradually add in additional flour in 1/4 cup increments until dough comes together and pulls away from the sides of the mixing bowl. If using an electric mixer, continue to knead at medium speed for about 5 minutes until dough is smooth and elastic. If mixing by hand, turn the dough onto a lightly floured surface and knead for 5-7 minutes, until dough is smooth and elastic.

Place dough in a lightly oiled bowl, cover with waxed paper or damp towel and let rise for 45-60 minutes, or until doubled in size.

TIP > If you live in a low-humidity environment, have dry heat in the house, or just want to aid rising process: heat oven on very low and then turn off. Place dough in a heat proof bowl and put in center rack of oven, covered by waxed paper or towel. Place a pan or bowl of boiling hot water in bottom of oven. Steam + gentle heat speeds the growth of the yeast.

Turn dough out onto a lightly floured surface and gently deflate. Cut in two. Shape into two long, oval loaves and place on a parchment-lined (or generously sprinkled with cornmeal) baking sheet. Cover with a clean dish towel, and let rise for 45 minutes.

Meanwhile, preheat the oven to 375F, with large baking stone inside, if using.

Stir together egg and water with a fork and lightly brush mixture over the risen loaves.
If using parchment paper, slide onto hot stone in center of oven. Bake for about 30 minutes, until bread is a dark golden brown and the bottom sounds hollow when tapped. An internal read thermometer inserted into the center of the loaf will read 195-200F.

Transfer loaf to a wire rack to cool.
Cool completely before slicing. (Or don't, but it won't slice as neatly.)

Makes 2 medium sized loaves.

LinkWithin

Related Posts Plugin for WordPress, Blogger...