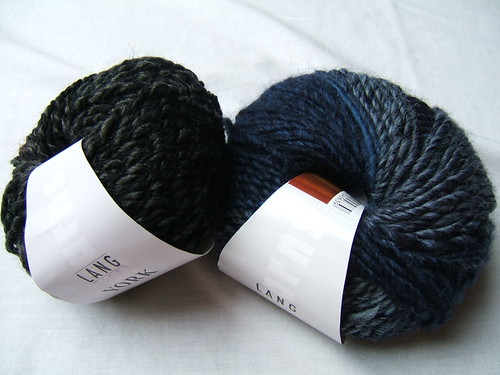
Monday, December 10, 2007

The Christmas knitting I said I wouldn't do

The race for getting Christmas gifts done is in full force! I don't even have time to be blogging, but I wanted to share my progress. Here's the socks that I knit for my mom.

Windowpane Socks for my mom
PATTERN SPECS
Yarn: Spunky Eclectic Supernova in the almost solid colorway, "Cranberry"
Needles: Knitpicks classic circulars size 2
Pattern: "Windowpane" (my own)

The pattern is my own. If you want a pair too, here's the "recipe":
CO 50 sts in sportweight yarn (my gauge was 6 sts per inch). Knit about an inch of 3 x 2 rib. Start patterned rows (K 3, P 2 around. Every 8th row, purl all the way around.) Short row heel, short row toe (according to Priscilla's Dream Socks - Google it for free pattern).

The only thing that bothers me about these is that the two sides of the heel don't match:
Windowpane short-row heel detail
I'm not sure what I'm doing, and it's hard to tell in the picture. I mean, they're perfectly functional and look fine. They'll be inside shoes. But they're not exactly the same, and that bugs me just a little.
Windowpane pattern detail

Moving on.

My brother Joel requested this Husky from a knitted toy book we were looking at together. Very unfortunately, it's turning out to look exactly like a rat.
Husky in progress
See?
Husky face
I really don't like the felt eyes. I wish so badly that I'd thought ahead and ordered some safety eyes, but it's too late now. Ah well.

Along with the Husky (and a bear for my brother Christopher), I'm also knitting Joel and Christopher hats out of these:
Yarn for hats (Christmas gifts)
All of this supposedly by tonight. Right.

Well, I hope all of your Christmas knitting is going well! (Or that perhaps you are smart enough to not do it at all?) Cheers!

Sunday, December 02, 2007

Some knitted things!

Ok, since it's almost Christmas, I have to say: if you are my family, please just don't read this blog until after the holidays. Thanks.

Moving right along. I've been busy. Really busy. And distracted. However, I have been getting a fair bit of knitting in. Some of it's photographed, some not. I'm not going to bore you with stories of the bad winter light and such, blah blah blah, yes, we all know. I have photographed what I can, and I will post more photographic evidence as light and time allow.

I've just finished this scarf/hat set for my sister Hannah.
Scarf/hat set
The hat is a Zeebee (sorry, the link feature in Blogger isn't working and I don't feel like writing code at the moment, so here's the link spelled out: "http://www.schmeebot.com/nid/283.htm"), which I am hopelessly in love with. The pattern, I mean, not the colors. The color mix contains orange which made it almost physically painful for me to knit, but the design -- oh! The design. I love that I can plug numbers into the website and have it spit out a pattern perfect for my gauge and head size. I love the way that it's knit side to side. I love the angles of the short rows. I love the way that I could knit mindlessly while watching a movie, yet stay interested enough to knit at other times as well. I love that the two edges are grafted together at the end instead of seaming, making this a perfectly seamless. There's something to be said for smartly written, carefully crafted patterns.
Zeebee hat
I modified the intent of the pattern by adding an extra 4-1/2 inches in length to make a thick, warm folded up edge.
Cabled scarf
This pattern is a cabled scarf that I found somewhere. I really can't remember where, at the moment and I don't have the pattern handy....too tired to look, but I'll edit later to add the name.

PROJECT SPECS:
Yarn: HandpaintedYarn.com Merino Bulky
Needles: size 13 for scarf, size 9 for hat. Options Harmony from Knitpicks.
Pattern(s): unknown cabled scarf, Zeebee hat
Cast-on to cast-off: about a week, total (hurrah for bulky yarn!)
Notes: While I wouldn't go for these colors personally, and am usually more about the thinner, more delicate knits, this is supposed to be all about my sister. So I'm trying. I really hope that she actually likes them.

I finished knitting the Button Me Up sweater, but am still looking for buttons. (Haven't looked to hard yet -- I've been too busy, but I will begin to look in earnest soon.)

On my needles right now are a pair of socks for my mom. I started them on Friday, and I'm past the heel. I'm knitting them two-at-a-time, magic-loop, with some Spunky Eclectic Super Nova Sport, so it's a little faster than ordinary sock knitting. Perfect for this time of year!

Some new books I got this week that I will be reviewing in upcoming podcast episodes:
New books

I've also decided to add a new Christmas tradition in my little family: Christmas books. What better way to start, than with some by Jan Brett?
Christmas books
I love Christmas.

Wednesday, November 21, 2007

Finnish Cardamom Braid

Edited to add photo:
DSCF8765

Here's the bread that I'll be baking tomorrow (I'll add a photo when I get a chance). Recipe is from Taste Of Home magazine, and I've tweaked it just a tiny bit.


Finnish Cardamom Braids

2 pkgs.(1/4 oz each) active dry yeast
1/4 cup warm water(110-115 deg)
2 cups warm milk(110-115 deg.)
3/4 cup sugar
1/2 cup butter or margarine, softened
1 1/2 tsp. salt
3/4 tsp. ground cardamom
2 eggs
1 Tablespoons Vital Wheat Gluten
7 to 8 cups all puirpose flour

In a mixing bowl, dissolve yeast in warm water. Add milk, sugar, butter, salt, cardamom, eggs, Vital Wheat Gluten, and 3 cups flour. Beat until smooth. Stir in enough remaining flour to form a soft dough. Turn onto a floured surface. Knead until smooth and elastic, about 6-8 minutes. Place in a greased bowl, turning once to grease top. Cover and let rise in a warm place until doubled, about 1 hour. Punch dough down. Turn onto a lightly floured surface, divide in half. Divide each half into thirds. Shape each piece into a 13-in. rope. Place 3 ropes on a greased or parchment paper covered baking sheet. Braid ropes, pinch ends to seal and tuck under. Repeat with remaining dough. Cover and let rise until doubled, about 45 minutes.

After loaves have risen, before baking, I paint them with mixture of:
1 beaten egg
2 Tablespoons milk

Sprinkle librally with granulated sugar.
Bake at 350 deg. for 25-30 minutes or until golden brown. Remove from pans to wire racks to cool.

Yield: 2 loaves.

Note: if possible, after braiding loaves, place on parchment covered baking sheets. When pre-heating oven, put two baking stones in for 20 minutes to heat through. Slide loaves on parchment off of baking sheets on to baking stones and bake as directed. This adds to the great texture of the bread.

Stuffed Beef Tenderloin

Main course for our Thanksgiving dinnner tomorrow.

Recipe from Taste Of Home magazine February/March 2002

Stuffed Beef Tenderloin

Serving Size : 12

1 cup olive or vegetable oil
2 tablespoons Worcestershire sauce
1 teaspoon each dried oregano, basil and thyme
1 teaspoon garlic salt
1 teaspoon salt
1/2 teaspoon pepper
1 (3- to 4-pound) whole beef tenderloin -- trimmed
Stuffing:
2 cups sliced fresh mushrooms
1/2 cup sliced green onions
1 (8-ounce) can water chestnuts -- drained and chopped
1/2 cup butter or margarine
2 cups seasoned bread crumbs
3/4 cup egg substitute
1/4 cup grated Parmesan cheese
1/2 teaspoon dried oregano
1/2 teaspoon dried rosemary -- crushed
1 teaspoon fennel seed
1/2 teaspoon pepper

In a large resealable bag, combine the oil, Worcestershire sauce and seasonings. Make a lengthwise slit about three-fourths of the way through the tenderloin. Place in bag; seal and turn to coat. Refrigerate for 4 hours or overnight. In a skillet, saute mushrooms, onions and water chestnuts in butter until onion is tender. Remove from heat. Add remaining stuffing ingredients; mix well. Discard marinade. Open tenderloin; spoon stuffing on one side. Close and tie with kitchen string. Place in a greased shallow roasting pan. Bake, uncovered, at 350' for 1-1/2 hours or until meat reaches desired doneness (for rare, a meat thermometer should read 140'; medium, 160'; well-done, 170'). Let stand 10-15 minutes before removing string and slicing.

A homecoming! And a pie crust to end all others

(At the end of this post is the best pie crust recipe ever -- if you haven't made yours yet, I urge you to give it a try!)

Today, the Mr. came home!!

So much mail was waiting for us when we got home!

We were all so excited to see him again. It's been four weeks!

I haven't been doing much cooking lately, so to ease into it, Sparky and I made my mom's Honey Whole Wheat Bread in the bread machine last night, and tonight I made hummus, and baked up a double batch of whole-wheat pita. I always forget just how great warm, fresh homemade pita is. Mmmm.

Tomorrow's Thanksgiving dinner has taken a bit of planning. Mr. Fiberflash is not a traditional sort of guy, and doesn't enjoy most of the dishes that make up the usual meal (i.e. any sort of pie, sweet potatoes, turkey). We all love ham, but he wanted to keep the crowd to just our little family for tomorrow (since we've been apart for so long), and I didn't want to have to dream up ham-inspired dishes for the next 6 months just to use it all up. Another challenge is that I have a tiny oven here that has only one rack. Everything has to be done very strategically for a large meal. Thus, the following menu:

Appetizer: Shrimp with Caribbean inspired lime spiked cocktail sauce (Cook's Illustrated Best Recipes)
Salad: Spicy mustard dressing on mixed greens with pear (Gourmet Magazine, most current issue)
Side: Potatoes (not sure how yet -- probably just boiled with salt and butter)
Bread: Slightly sweet Cardamom Bread (Taste Of Home)
Main: Stuffed Beef Tenderloin -- meat is wrapped around a mixture of sauteed mushrooms, onions, garlic and water chestnuts. (Also Taste Of Home)
Dessert: Zabaglione Parfaits -- a Marsala flavored custard, layered with whipped cream. Mine will have chocolate curls on top, but it can also include fresh fruit.

I've also made a double pie crust (using the best recipe I've found so far! Its has the consistency of play-dough, and yet still manages to be tender and flaky), so the following may make their appearance, although the Mr. won't touch them:
Pumpkin Pie
Bittersweet Chocolate Pecan Pie - chocolate is layered between crust and filling rather than being mixed in. (Gourmet Mag -- current issue)

I might be eating pie for the next two weeks, but worse things could happen. I also considered cupcakes, but really, that might be taking things just a bit too far.


Pie crust recipe (Cook's Illustrated magazine):

Foolproof Pie Dough

- makes one 9-inch double-crust pie -

The trick to this pie crust is the inclusion of vodka. Eighty-proof vodka, which is 60 percent water and 40 percent alcohol, adds moistness to the dough without aiding in gluten formation since gluten doesn't form in ethanol. Although the recipe includes 8 tablespoons of liquid, the alcohol vaporizes during baking, resulting in a tender crust that only contains 6 1/2 tablespoons of water. Because of the extra liquid, the dough will be moister than most standard pie doughs and will require up to 1/4 cup more flour.

Ingredients

2 1/2 cups (12 1/2 ounces) unbleached all-purpose flour
1 teaspoon table salt
2 tablespoons sugar
12 tablespoons (1 1/2 sticks) cold unsalted butter, cut into 1/4-inch slices
1/2 cup cold vegetable shortening, cut into 4 pieces
1/4 cup cold vodka
1/4 cup cold water

Procedure

1. Process 1 1/2 cups flour, salt, and sugar in food processor until combined, about 2 one-second pulses. Add butter and shortening and process until homogeneous dough just starts to collect in uneven clumps, about 15 seconds (dough will resemble cottage cheese curds and there should be no uncoated flour). Scrape bowl with rubber spatula and redistribute dough evenly around processor blade. Add remaining cup flour and pulse until mixture is evenly distributed around bowl and mass of dough has been broken up, 4 to 6 quick pulses. Empty mixture into medium bowl.

2. Sprinkle vodka and water over mixture. With rubber spatula, use folding motion to mix, pressing down on dough until dough is slightly tacky and sticks together. Divide dough into two even balls and flatten each into 4-inch disk. Wrap each in plastic wrap and refrigerate at least 45 minutes or up to 2 days.

Tuesday, November 20, 2007

Paris!

Yes, we did visit Paris about two months ago, and have been to The States since, but no time like the present to catch up, yes? (By the way, we did manage to return safely to Germany this past weekend, and I'll post pics of our trip..um...later. Right.)

Note: all collages are clickable and will take you to their respective albums.
Paris. This was one of the coolest places we've been yet, I think. The top two pictures in the collage below are from a stop we took at the side of the road for the little guys to stretch their legs and Daisy to eat. Mr. Fiberflash always knows how to make things fun for everyone, no matter where we are. (The boys are actually running on a deserted farm road that ran parallel to the road we were driving on, which was on the other side of the hedge.)

Bottom left, you can see the "roller cops". Would be interesting to be accosted by one of these dudes.

At bottom right, Sparky looks over the whole of Paris from the grounds of the Sacre Coeur.
Paris Misc.


The science museum was great! For the children, we had to buy a ticket for a 90-minute session of age-appropriate play and discovery. It was so cool. There's way too much to point out things in each shot, so here's an overview:
Paris Museum


The food. As expected, food in Paris was lovely. We weren't looking for the fancy super high-end places that give you "bites" of food teased into little towers on gilt-edged plates. Instead we wanted the people's food, things we could sink our teeth into, get our hands dirty.

Bottom row: a diaper incident led to Max eating his dinner pants-less and proud.
Paris Eating


Top row (of collage below) is from an open-air market we came across. The breads, cheeses and cured meats were uncovered and just out there on the displays. So unsanitary! So utterly delectable!

Second and third rows are of a place called Fauchon. Now, I did just say that we were not in search of high end food. I must admit, however, that we were in search of high end chocolate. Fauchon is also a patisserie. It was an incredible place, and is recognized as one of the finest of chocolatiers. We were prohibited from taking pictures inside, so instead I went all around the outside and took shots of each of their display windows (!). (Really though, click on the Fauchon link -- you can buy their chocolates online too!!)

Bottom row is some souvenirs. I don't think I have to specify who got what of those last two. Not included in these pictures is a watercolor print of the Awful Tower (as the boys called it), which we hung in their room, and they love.
Paris Shopping


Here are some shots of just general sightseeing. The top left corner was of a random bronze statue of a man coming out of a wall. No explanation to it's significance, and the boys were a bit disturbed by it, but we thought that it was pretty cool. The picture immediately below it is of the Cartier flagship store, located on the broad, beautiful "avenue des Champs-Elysees", lined with other flagship stores like Gucci, Vuitton and Cavalli (just to name a few).

Third and most of fourth row are, of course, the Eiffel Tower. I never knew why it was there or what it was for. Now I do, but if you want to know, you'll have to read about it for yourself. It's pretty interesting, and not at all what I thought. (Well, actually, I don't know that I thought anything about it 'till I saw it in real life.) The image copyright portion of the Wikipedia article, however, just completely make me see red (if you click on that link above, click on number 7 in the contents box).

Bottom row: Moulin Rouge, Sacre Coeur, and a view of Paris from the Sacre Coeur grounds.
Paris Sights


We didn't go up into the Eiffel Tower, and we didn't plan to. There's no way that I'm going to wake up early to stand in line for hours to go up to the top of a tower -- especially when I can see it some other way. Through the use of a great guide book and some direction from a message board I'm part of, we felt like we got a great slice of the essence of Paris, and someday hope to return after the Mr. retires to explore it fully.

One of my favorite things about traveling with Mr. Fiberflash is that he makes it a point to take time to make sure each person has fun, from the smallest to the tallest. When we're plotting our journies, he always researches things that will be interesting to each one of us, not just things that he thinks would be cool. Because of that style of planning, the trip to Paris was a great success for all of us, and even the boys have great memories that they still talk about.

Friday, October 26, 2007

S'mores cupcakes and wooly warmth

I've been so busy for the past few weeks. Besides producing the new podcast episode, I was also getting ready to fly home for a visit. My husband was leaving for a work-related thing that would take him away from home for about a month, and so I scrubbed my house from top to bottom (with the help of my friend Jillian!), and packed up myself and the kids and flew back to NY on Tuesday.

Anyway, that's my reason for not showing you this earlier.
Button Me Up in progress
It's the Button Me Up pullover from Cosmic Pluto, and I'm knitting it out of Handpaintedyarn.com Handspun Bulky in Wine Red. I sort of feel like a cheater because I'm using handspun that I didn't personally spin, but I'll get over it. I love the color; it's the perfect shade of burgundy.

I cast on for this a few weeks ago and was just starting the sleeves when I suddenly realized something -- I was going to run 2 skeins short, because I hadn't read the pattern carefully enough! (Pattern calls for 4 skeins in MAIN color and 2 in CONTRASTING. I was knitting it all in one color, and...right. Just 4 skeins.) I went on the Handpaintedyarn.com site to buy the two more needed, and found that they had sold out of the color! I really didn't want to rip everything back to knit it in two colors instead, so I searched around on Ravelry to see if anyone else had the same color that they'd be willing to sell me.

Two different people suggested emailing the yarn company to see if they had some extra in backstock that they just hadn't entered in the system. I did that, and as it turns out, there were 6 extra skeins just sitting there, unlisted!

I immediately ordered what I needed, and had it shipped to my mom's. It arrived yesterday, and I'm going to work on this exclusively until it's done.

This'll be my first "real" sweater that I've knit for myself, and I'm so excited to be able to actually wear it! It's been nice and chilly here too, so I'm sure that I'll get plenty of opportunity.

In other news, I finally blocked this.
Nightshade Canopy Shawl
PROJECT SPECS:
Pattern: Nightshade Canopy Shawl by Susan Laurance.
Needles: Size 9 KnitPicks metal interchangables
Yarn: My own handspun worsted/bulky, roving dyed by Amy of Spunky Eclectic
Notes: I will definitely knit this again -- probably a little bigger, in thinner yarn. It was a simple and satisfying project, and the pattern is well written and clearly laid out. I would recommend this for a first-time shawl project.

While in route to Paris, I worked on Sahara, and this is as far as I've gotten:
Sahara so far
Since it's been so grey and cold out, I've just been having a hard time finding it in myself to work on it. All I want is to snuggle into warm, thick, wooly goodness. Silk and rayon just haven't been pushing my button as of late.

Yesterday, I made S'mores Cupcakes:
S'mores Cupcake
Cupcake recipe from Cupcake Bakeshop, marshmallow frosting from Yumbrosia. At Cupcake Bakeshop, Chockylit filled the cupcakes with marshmallow fluff, but I didn't want to loose any of the graham crackery goodness, so I decided to spread the ganache over the top like she did, and then to pile on some marshmallowy meringue on top (piped out of a plastic bag with corner snipped off). My little sister (9-year-old Rachel) helped me with the double-layer frosting, and we had quite a fun time in the kitchen together.

Chockylit found that her cupcakes didn't quite rise and shrunk while cooling, and I had the same experience. I didn't think that it affected the overal quality of the final product though, so it was fine. Next time, I'd add less butter as she suggested to see if that helps any.

They've been a big hit with everyone who's tasted these so far. There's a buttery graham cracker crust on the bottom, and then a graham cracker-laced not-too-sweet cupcake. The ganache is bitter dark chocolate, which contrasts nicely with the fluffy, supersweet billowy topping. I tosted them under the broiler as a last step (with oven door open, of course!), which really took them over the top. I was going to stick a square of chocolate into the marshmallow frosting, but decided to stop while I was ahead.

Saturday, October 20, 2007

Saturday, October 13, 2007

Spinning and Cupcakes

Last weekend we spent four days in Paris on a spur-of-the-moment trip. It was even more beautiful than I'd imagined it would be, and I'm still organizing the pics! More on that in a future post.

Yesterday, I had a few spinning friends over to play (Rachel, Dina, Gina, and Jillian). Most of us have children, and they all kept each-other occupied for a good deal of the time. Most importantly, we created a new spinner! My friend Jillian has been wanting to learn, and her husband is buying her a wheel for Christmas. The get-together was set up in part so that she could try out wheels and get a feel for things.

Here she is, spinning for the very first time, with Rachel's guidance.
Rachel (right) teaching Jillian

It's always interesting to watch other people spin. Similar to watching other people knit -- I always learn something from checking out someone else's technique. (Jillian is actually very happy and excited in this picture, but that's the serious look of deep concentration.)
Spinning!

Dina and Gina.
Dina and Gina

Spinning
Ever since I started reading the Cupcake Bakeshop blog, I've been looking for an excuse to use one of her recipes (her photographs make me feel like I could just reach out and eat one!). I finally got the chance!

Chocolate Cupcakes with Salted Caramel Frosting
Chocolate cupcake w/Salted Caramel Frosting

I knew that I would love them, but I wasn't sure how they'd go over with everyone else, especially the children.
Eating Cupcakes
I shouldn't have worried. (Dina's daughter "Nugget" on left, Rachel and "K" on right.)

Topped with a square of salted caramel and a sprinkle of Fleur De Sel
Chocolate cupcake w/Salted Caramel Frosting

I baked up half of Chockylit's recipe which supposedly should have given me only a dozen cupcakes, but even after overfilling the muffin cups (resulting in flat topped confections), I still turned out 15. I'm pretty sure I could have gotten 24 if I'd filled them half-way, like I usually do. Next time I'll make a little more frosting too -- I piped generous swirls out of a plastic bag (Ziploc bag with the corner snipped open), and ran just a little short. Here's the halved recipe that I used -- the only changes are that I've taken out the "gluten free" half of it (full credit to Cupcake Bakeshop):

Chocolate Cupcakes with Salted Caramel Frosting:

Cupcakes
18 regular cupcakes / 350 degree oven

3-1/2 ounces (100 grams) Valrhona 85% cacao (or any bittersweet chocolate)
1-1/2 sticks (171.5 grams) butter
1 cup + 2 Tablespoons (222.5 grams) sugar
4 eggs
1/2 cup + 2 Tablespoons (90 grams) flour, all purpose
2 tablespoons cocoa powder, unsweetened
3/4 teaspoon baking powder
1/8 teaspoon salt

1. Chop the chocolate and transfer into the bowl of a standing mixer.
2. Add the butter to the chocolate and place the bowl over a pan of simmering water. Stir until the chocolate melts and the butter is combined.
3. Remove from heat and stir in the sugar. Let the mixture cool for 10 minutes.
4. Measure out the flour, 2 tablespoons cocoa, 3/4 teaspoon baking powder, and 1/8 teaspoon salt into a small bowl.
5. Transfer the cooled chocolate/butter mixture to the electric mixer and beat for 3 minutes.
6. Add one egg at a time, mixing for 10 seconds between each.
7. Sift the flour mixture into the wet ingredients and mix to combine.
8. Scoop into cupcake cups only 2/3s full. Bake all the cupcakes at 350 F for 25 minutes or until a toothpick comes out clean.

Note: If the oven is not hot enough than these cupcakes may over-flow. One way to be safe is to either fill 2/3’s full or another trick I use is to preheat to 375, then drop the heat to 350 once I put the cupcakes in. I also rotate the pans after 15 minutes of baking. It is safe to gently move them at that point and I find the lower back of my oven to be a bit cooler.


Salted Caramel

2 tablespoons water
1/2 cup sugar
1 tablespoons light corn syrup
1/4 cup heavy cream
1 tablespoons butter
1/4 teaspoon lemon juice
1/4 teaspoon salt, kosher or sea

1. Combine the water, sugar, and the corn syrup in a deep saucepan and cook over medium heat.
2. Stir together with a wooden spoon until the sugar is incorporated.
3. Cover the saucepan and let it cook over medium heat for 3 minutes.
4. After 3 minutes, remove the lid, increase the heat to medium-high, and bring to a boil.
5. Do not stir from this point on, but it is important to carefully shake the pan so that one area of the caramel doesn’t burn.
6. Continue to cook until the caramel turns an even amber color then remove from the heat and let stand for about 30 seconds.
7. *** This is the dangerous part *** Pour the heavy cream into the mixture. Wear oven mitts, stand away from the pan, and be careful. The mixture will bubble up significantly.
8. Put the mixture back on the heat, and stir, again being careful. Add the butter, lemon juice, and salt. Stir until combined.
9. Measure 1/2 cup into a Pyrex measuring cup. Stirring occasionally, allow to cool until thick like molasses and warm to the touch, about 20 minutes.

Note: There was a small bit of extra caramel that I poured onto a small plate that I covered in aluminum foil and greased with vegetable oil. I transferred the plate to the freezer for about 30 minutes. I chopped the caramel quickly into squares (its starts to get soft) and topped each cupcake with a square.

Salted Caramel Frosting

1 stick butter
4 ounces or 1/2 package of Philly cream cheese
1 cup powdered sugar
1/2 cup salted caramel

1. Bring butter to room temperature by letting it sit out for 1 or 2 hours.
2. Beat butter and cream cheese at medium speed until creamy.
3. Add 1/2 cup of the salted caramel and beat to combine.
4. Sift powdered sugar a little at a time into the butter/cream cheese mixture and beat to combine. (Taste as you mix and add more or less to suite your specifications)
5. Chill to thicken up, if needed.

Assembly
1. Frost cooled cupcakes with a generous amount of frosting.
2. Sprinkle each cupcake with sea, kosher salt, or Fleur De Sel.
3. Top with a caramel candy, homemade or otherwise.

Monday, October 01, 2007

A purple hat and some tasty bread

In my order from 
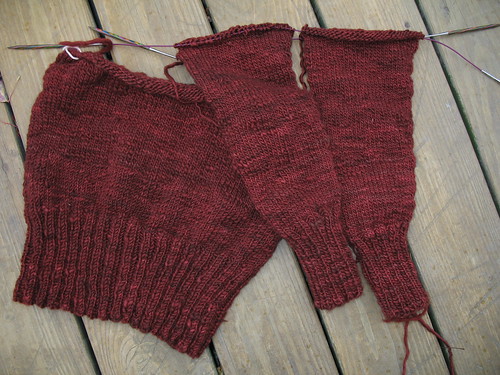
KnitPicks that I received last week, there were three balls of their worsted weight pima cotton/merino blend (75%/25%), 
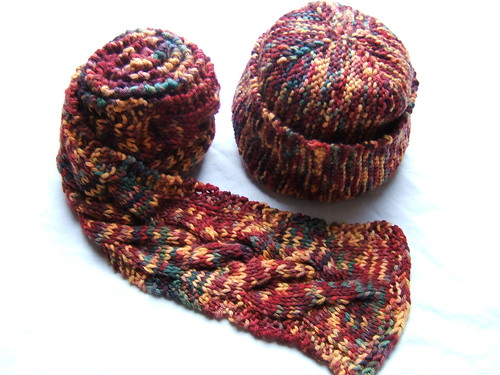
Main Line. I've been wanting to swatch this stuff ever since they came out with it last year. Since my knitting moments are all too often precious and few, what better way to redeem the time than by turning my swatch into a hat? (I will post the pattern later on today or tomorrow.)

Daisy's hat 3
This took exactly one ball of Dusty Lavender, with extra in Natural for the pom-pom.
Daisy's hat 2
I had embroidered bubbles on it, but then when I tried it on Daisy's head, the hat was a little too big, and has to be folded up for now. The bubbles got lost in the folded brim, so I'll have to save that idea for a later date.

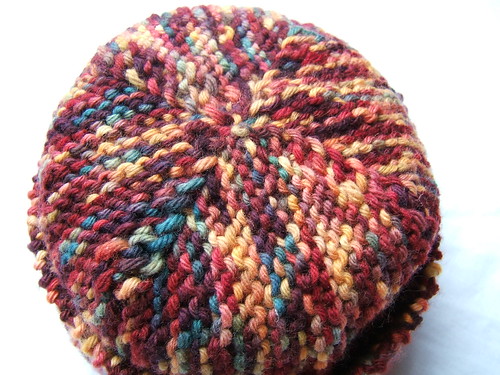
Here is the hat, unfolded.
Daisy's hat
I love the fact that the cotton makes it just a little cooler, which is perfect for early fall and spring, and the Merino adds just enough bounce to make this easy to work with. My stitches were crisp and even, but the yarn felt soft and didn't abrade my hands the way 100% cottons often do.

I will probably order more to knit a little cardi to match, because I have a feeling that this will wear well.

My only complaints about this yarn is that they come in slightly skimpy 82 yard balls. At $3.29 per ball, that brings the price for an average, medium sized woman's cardi up to $49.35. Not exactly the bargain basement prices that I expect when I think of KnitPicks brand.

A few days ago, I found this recipe for Potato Parmesan Bread over at food blog, Baking Bites. I've always loved potato bread, and had to give it a try.

Starch from mashed potato feeds the yeast, giving it an extra boost for a nice airy loaf.
Potato Bread Loaf
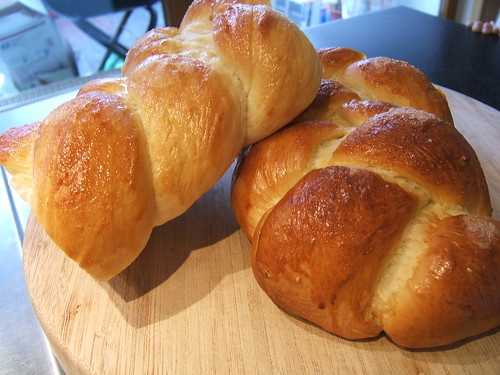
I made a few changes by adding Vital Wheat Gluten and some extra butter, substituted Romano for the Parmesan, bread flour for the all-purpose, used two red boiling potatoes instead of the one russet, used the cooking water from the potatoes, and heated the milk. I divided it unto two loaves instead of one, which allowed me to cut the baking time. I set the loaves on parchment covered baking sheets to rise, which I then slid onto a preheated baking stone to bake. All changes are reflected in my adapted recipe, below.

Happily, the bread rose high and lofty, with a moist interior. The cheese adds a surprisingly subtle note and lingers just a bit on the aftertaste, and the bread is equally good plain, or with butter and jam.
Potato Bread Slices
I would like to experiment with substituting cheddar, and adding some whole wheat to make this a little hardier. Bulgar wheat would also add a nice crunch -- I might try that as well.


Romano Potato Bread

2 red boiling potatoes (or enough potato to equal 1 cup when mashed. Potato flakes = OK)
4 tbsp butter (1/2 stick)
1 cup milk, heated to about 110-115 deg. (low fat is fine)
1 Tbsp active dry yeast
1 Tbsp sugar
2 tsp salt
1/2 cup potato water (reserved from water drained from cooking potatoes. Add extra water if needed)
1 Tbsp Vital Wheat Gluten
4-5 cups bread flour
1 cup Romano cheese, grated
1 egg + 2 tbsp water (for egg wash)

Peel potato and cut into small, even chunks. Boil potato pieces in a small saucepan until tender. Drain and reserve cooking liquid and completely mash potato (a ricer works well here, or you can force through a fine strainer) until smooth. Transfer potato to a large mixing bowl and stir in butter and milk, mixing until well combined. Mixture should be between 110 and 115 degrees, or the yeast will not activate properly.

Stir active dry yeast and sugar into the potato mixture. Let stand for 5-10 minutes, until mixture is slightly foamy. Add in salt, water, Vital Wheat Gluten and 3 cups of flour. Mix until smooth, either stirring with a wooden spoon or using the dough hook attachment on an electric stand mixer. Stir in Romano cheese and gradually add in additional flour in 1/4 cup increments until dough comes together and pulls away from the sides of the mixing bowl. If using an electric mixer, continue to knead at medium speed for about 5 minutes until dough is smooth and elastic. If mixing by hand, turn the dough onto a lightly floured surface and knead for 5-7 minutes, until dough is smooth and elastic.

Place dough in a lightly oiled bowl, cover with waxed paper or damp towel and let rise for 45-60 minutes, or until doubled in size.

TIP > If you live in a low-humidity environment, have dry heat in the house, or just want to aid rising process: heat oven on very low and then turn off. Place dough in a heat proof bowl and put in center rack of oven, covered by waxed paper or towel. Place a pan or bowl of boiling hot water in bottom of oven. Steam + gentle heat speeds the growth of the yeast.

Turn dough out onto a lightly floured surface and gently deflate. Cut in two. Shape into two long, oval loaves and place on a parchment-lined (or generously sprinkled with cornmeal) baking sheet. Cover with a clean dish towel, and let rise for 45 minutes.

Meanwhile, preheat the oven to 375F, with large baking stone inside, if using.

Stir together egg and water with a fork and lightly brush mixture over the risen loaves.
If using parchment paper, slide onto hot stone in center of oven. Bake for about 30 minutes, until bread is a dark golden brown and the bottom sounds hollow when tapped. An internal read thermometer inserted into the center of the loaf will read 195-200F.

Transfer loaf to a wire rack to cool.
Cool completely before slicing. (Or don't, but it won't slice as neatly.)

Makes 2 medium sized loaves.

LinkWithin

Related Posts Plugin for WordPress, Blogger...